By ghlabdl
Sat Jun 23, 2012 12:39 am
Something was up with my external SCSI zip reader. I naturally went to MPC-Forums for help. Instead of getting down in the dumps, I took the lack of responses as a subversive suggestion to install a zip drive into my MPC all by my purty self!
I was impatient and decided not to wait online for parts. This made the total of my installation efforts a whopping $25. You, with some tools you can borrow or buy and return hastily, can do it for much less if you have slightly more patience than I do.
There weren't any real instructions on how to do it, just many separate pieces of advice that were taken out of context. So if anyone wants to rep the Zip game as opposed to a MMC (which I should've done but fugget), here ya go:
Ingredients:
Iomega z250ATAPI - 250mb Internal Zip drive - $10 - ebay

40 pin IDE ribbon (NOT 39) - $3 - ebay
)HtcwUBPH(dLKFbQ~~60_58.JPG)
4-Pin Molex connector - $2* - ebay

*if you have an old PC computer that you don't use, you can rip a nice, long Molex connector w/ it's wires out and use it with some snipping of unnecessary stuff
Tools:
Soldering iron
Solder
Scissors
Exacto knife/razor/knife[/b]
Installation Instructions:
1. Find a pillow, blanket or nice soft surface to lay down on a table. You will lay your MPC upside down onto this soft surface so you can work, and so you don't possibly wreck yr slider and data wheel controls.
2. Unfasten all screws from the bottom. Be careful not to lose any.
3. Remove the floppy drive. Unplug the floppy power cable (or a JST-4) from the MPC motherboard. Next, you unplug the 34-pin Floppy connector from the motherboard. You will most likely need to CAREFULLY cut either the ziptie holding all these wires together, or the wires themselves, to safely remove the floppy drive from your MPC. Once this is done, you can unplug with 34-pin connector from the motherboard by pushing down gently on the side holders to unleash it. The floppy drive should no longer connected to the MPC.
4. Solder JST-connector wires to Molex cables. The JST>Molex connection powers your zip drive to gobble up and vomit out your zip disks. Cut the yellow and black wires from your Molex connector, you won't need them. Be sure to measure a close, close estimate of what your soldering JST>Molex power cables will be. No rulers or bullihst needed, but you don't want it to come out too short or you won't be able to connect it from the motherboard to the distanced male Molex connection from your zip drive later on. And you'll look like an idiot having to solder even more cables together to extend it later on. And your girlfriend will leave you for your best friend because you're taking too long to install a fkcuing zip drive. And you're family will be disappointed in you for making a small DIY task even more difficult. Or, maybe not.
Solder the black JST cable to the black Molex cable, and solder the red JST cable to the Molex cable.
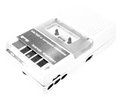
5. Grab your 40-pin IDE ribbon. The 40-pin is what makes your MPC recognize, use and abuse the zip drive. Measure it with your zip drive inside the MPC to see how much, if at all, you'll need to fold up that bad boi so it's not spread out all over the guts of yr MPC like a delicious blend of herbs, garlic and goat cheese. Fold that xit up and connect the MASTER side of the IDE cable to the zip drive. (You'll be able to tell what the MASTER side is by either a clearly written declaration or a coloration of the connector. Mine was a cold dead blue, like my gf's heart.)
6. Set the jumper on your zip drive to MASTER. This is crucial--if you don't do this, your MPC won't recognize the ATAPI device that will clearly be plugged into it and you might explode into a violent rage.
7. Connect the zip drive to your MPC's mamaboard. It's probably best to secure your JST>Molex connection first, but whatever is easiest for you the better. Connect the JST>Molex and the 40-pin IDE ribbon running from your zip drive into the MPC motherboard's ATAPI port (right next to the JST port).
8. Carefully test the zip drive's power and MPC's ATAPI recognition of your drive. Don't screw all that crap in just yet. Place the bottom cover over that internal mess so no dust creeps in, however. Turn on the MPC and take notice of two things:
- Whatever power-indicator of your zip drive lights on when the MPC powers on. This signifies that your zip drive is properly connected to power, and that your slavish soldering work was not in vain.
- Hit up the LOAD screen (SHIFT+3--cmon, dawg) and see if it recognizes your zip as an ATAPI device. It'll replace the FLOPPY option. If it does--AWESOME, meet me at step #9, bruh.
(If it doesn't recognize it you may have fkuced up with either correctly assigning the ends of your 40-pin ribbon where they belong or you haven't set the jumper of your zip drive to master.)
9. Screw the bottom panel back on. Before doing this, screw in the placeholder (or w/e) connecting that slab of metal you knicked off that floppy to the zip drive. It'll be hell to do this if you save it for later once you've already screwed on the bottom pannel.
10. Put in an empty zip disk into the zip drive. Power up your MPC and format your Zip drive and party hard.
Hit up this thread for any questions! I hope this was clear.
I was impatient and decided not to wait online for parts. This made the total of my installation efforts a whopping $25. You, with some tools you can borrow or buy and return hastily, can do it for much less if you have slightly more patience than I do.
There weren't any real instructions on how to do it, just many separate pieces of advice that were taken out of context. So if anyone wants to rep the Zip game as opposed to a MMC (which I should've done but fugget), here ya go:
Ingredients:
Iomega z250ATAPI - 250mb Internal Zip drive - $10 - ebay
40 pin IDE ribbon (NOT 39) - $3 - ebay
4-Pin Molex connector - $2* - ebay
*if you have an old PC computer that you don't use, you can rip a nice, long Molex connector w/ it's wires out and use it with some snipping of unnecessary stuff
Tools:
Soldering iron
Solder
Scissors
Exacto knife/razor/knife[/b]
Installation Instructions:
1. Find a pillow, blanket or nice soft surface to lay down on a table. You will lay your MPC upside down onto this soft surface so you can work, and so you don't possibly wreck yr slider and data wheel controls.
2. Unfasten all screws from the bottom. Be careful not to lose any.
3. Remove the floppy drive. Unplug the floppy power cable (or a JST-4) from the MPC motherboard. Next, you unplug the 34-pin Floppy connector from the motherboard. You will most likely need to CAREFULLY cut either the ziptie holding all these wires together, or the wires themselves, to safely remove the floppy drive from your MPC. Once this is done, you can unplug with 34-pin connector from the motherboard by pushing down gently on the side holders to unleash it. The floppy drive should no longer connected to the MPC.
4. Solder JST-connector wires to Molex cables. The JST>Molex connection powers your zip drive to gobble up and vomit out your zip disks. Cut the yellow and black wires from your Molex connector, you won't need them. Be sure to measure a close, close estimate of what your soldering JST>Molex power cables will be. No rulers or bullihst needed, but you don't want it to come out too short or you won't be able to connect it from the motherboard to the distanced male Molex connection from your zip drive later on. And you'll look like an idiot having to solder even more cables together to extend it later on. And your girlfriend will leave you for your best friend because you're taking too long to install a fkcuing zip drive. And you're family will be disappointed in you for making a small DIY task even more difficult. Or, maybe not.
Solder the black JST cable to the black Molex cable, and solder the red JST cable to the Molex cable.
5. Grab your 40-pin IDE ribbon. The 40-pin is what makes your MPC recognize, use and abuse the zip drive. Measure it with your zip drive inside the MPC to see how much, if at all, you'll need to fold up that bad boi so it's not spread out all over the guts of yr MPC like a delicious blend of herbs, garlic and goat cheese. Fold that xit up and connect the MASTER side of the IDE cable to the zip drive. (You'll be able to tell what the MASTER side is by either a clearly written declaration or a coloration of the connector. Mine was a cold dead blue, like my gf's heart.)
6. Set the jumper on your zip drive to MASTER. This is crucial--if you don't do this, your MPC won't recognize the ATAPI device that will clearly be plugged into it and you might explode into a violent rage.
7. Connect the zip drive to your MPC's mamaboard. It's probably best to secure your JST>Molex connection first, but whatever is easiest for you the better. Connect the JST>Molex and the 40-pin IDE ribbon running from your zip drive into the MPC motherboard's ATAPI port (right next to the JST port).
8. Carefully test the zip drive's power and MPC's ATAPI recognition of your drive. Don't screw all that crap in just yet. Place the bottom cover over that internal mess so no dust creeps in, however. Turn on the MPC and take notice of two things:
- Whatever power-indicator of your zip drive lights on when the MPC powers on. This signifies that your zip drive is properly connected to power, and that your slavish soldering work was not in vain.
- Hit up the LOAD screen (SHIFT+3--cmon, dawg) and see if it recognizes your zip as an ATAPI device. It'll replace the FLOPPY option. If it does--AWESOME, meet me at step #9, bruh.
(If it doesn't recognize it you may have fkuced up with either correctly assigning the ends of your 40-pin ribbon where they belong or you haven't set the jumper of your zip drive to master.)
9. Screw the bottom panel back on. Before doing this, screw in the placeholder (or w/e) connecting that slab of metal you knicked off that floppy to the zip drive. It'll be hell to do this if you save it for later once you've already screwed on the bottom pannel.
10. Put in an empty zip disk into the zip drive. Power up your MPC and format your Zip drive and party hard.
Hit up this thread for any questions! I hope this was clear.
// GHLCAMP // SOUNDGHLOUD // TUMGHLR //